When I first started quilting, one of my biggest frustrations was finishing a quilt block that was supposed to be 12 1/2 inches square, but I would frequently end up with something closer to 12 1/4 inches. Why? I used the quarter-inch mark on the stitch plate on my machine. I dutifully went out and bought a quarter-inch piecing foot. My blocks were still finishing less than 12 1/2 inches. Dozens and dozens of blocks later, I have the answer!
#1. Thread matters.
Yes. The thicker the thread, the more space it takes up in the seam. You would not think the tiny circumference of a strand of thread would make a difference, but it does. For piecing, use a 50 weight thread both in the bobbin and for the top thread. A much heavier and thicker 30 weight will take up more space in the stitched seam. When you add up all the seams in the block, this loss makes a difference. Most threads marked “Quilting Thread” are 30 weight. They are meant for quilting the top, not for piecing.
#2. Use a scant quarter-inch seam.
After you have sewn your seam and folded it over to press it, a tiny amount of fabric will be lost in the turn of the fabric. Just like the thread issue, if you add the tiny fabric loss across all the seams in the block, it matters. Add the loss of space from thread plus the loss of fabric in the fold, and this can account for as much as a quarter-inch loss in overall block size. That is why your 12 ½ inch block turned out to be 12 1/4 inches. This is where the scant quarter-inch seam saves the day. The scant quarter-inch seam is sewn just shy of the seam line by a couple of threads. To do this, we need to know where the quarter-inch seam line is.
#3. Measure the scant quarter-inch mark on your machine and mark it!
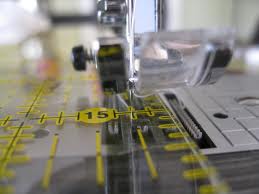
The truth is the quarter-inch mark on your seam plate is, most likely, inaccurate. Your quarter-inch foot may be inaccurate, too. Measure where the quarter-inch mark is for your machine, using your favorite machine needle. There are a couple of ways to do this. One is shown above. This quilter has placed her clear rotary ruler under her presser foot and has lowered her needle until it is pressing down on the quarter-inch mark on the ruler. She will then place a piece of masking tape exactly along the edge of the ruler to mark the true quarter-inch mark on her machine. In the future, when she places the edge of her fabric against the tape, she know she is at a quarter-inch. But wait, that doesn’t mark the scant quarter-inch.
To mark the scant quarter-inch mark, cut a strip of four-squares-to-the-inch graph paper. Each square will be an accurate quarter-inch. Trim it evenly along one of the vertical lines. Place the graph paper under the presser foot, and using your hand wheel, lower the needle until it pierces the paper just shy (by a couple of thread widths) of the first line in from the edge. Take a piece of masking tape and place it along the edge of the strip of paper, mark the exact scant quarter-inch mark. (You can do this using the ruler method too, but this technique is a little easier to see and you can visually check the results by looking at the hole in the paper made by your needle.)
When sewing your next seam, line your fabric up with the line marked by the masking tape and you will be ensured of sewing an accurate scant quarter-inch seam.
There is one last thing you can do to help achieve an accurate seam.
#4. Sit in the same chair, at the same height, when you sew.
After starting a new project, always try to sit in the same chair, at the same height, when you sew. Sewing while sitting in a different position can make a significant difference in the quality of your seams. It is very easy to get a different measurement when you are viewing your project from a different angle.
Using these four tricks have helped me produce blocks that are the correct size. So, if you are frustrated with inaccurate seam widths, try these ideas and see if your accuracy improves.
Until next time,
Joan